
Simple Measuring Guide for Sliding Robe Doors
Below is a step-by-step guide of how to install sliding wardrobe doors. We are confident that anyone with basic DIY skills will be able to complete the whole process with ease.
TOOLS AND FIXINGS NEEDED:
Pozidrive screwdriver, measuring tape, hacksaw, bradawl, spirit level, electric drill, drill bits, screws and suitable wall plugs.
STEP 1: SIZING THE TRACKS
You will be provided with two tracks.
First measure the width of the top of your opening and use a setsquare to mark a straight line across the top track.
Second measure the width of the floor of your opening and mark a corresponding line across the floor track.
Cut the tracks using a fine tooth hack saw.
STEP 2: INSTALLING TOP & BOTTOM TRACKS
Position the top track and drill and plug into the ceiling.
Fix the top track using suitable screws and fixing (not supplied).
Note: The standard minimum size of 610mm is used as a wardrobe.
Before permanently fitting the floor track to the floor, fit the door into place and use a spirit level to ensure door is vertical.
Track will come with end caps to give a neat finish.
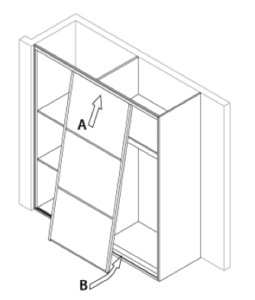
STEP 3: INSERTING THE DOORS
Install the back door first and install by inserting in the top track on an angle.
Straighten the door and lower the bottom wheels into the floor track grooves.
Measuring up for sliding wardrobe doors is simple. Just measure the height and width of your wardrobe opening. Our sliding wardrobe doors are designed to fit your space perfectly. Don’t worry if your opening is not completely level or parallel, our sliding wardrobes can be adjusted to compensate for these conditions.
To ensure the made to measure wardrobe sliding doors fit perfectly in your space, please follow these simple steps to measuring:
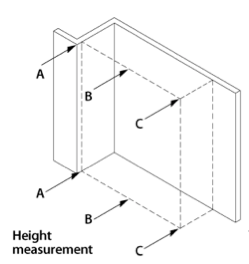
Step 1: Measure Height
The top track system will accommodate up to 15mm in height difference.
Measure at least three places as shown in diagram (e.g. A, B and C)
IMPORTANT – Use the smallest measurement when supplying us with height measurements.
Step 2: Measure Width
Check the walls with a spirit level to see if they bow or curve. Our optional strike plate will allow you to level up to 15mm using packers (not supplied). If you have coving and skirting you will need to remove a section of them to slide the strike plate in before installing. Measure in two places top and bottom. Please ensure you measure (A) above any skirting board and (B) below any coving that may hinder wardrobe installation.
IMPORTANT – Use the largest measurement when supplying us with width measurements.
NOTE – both top and bottom tracks are supplied over length to allow you to trim them to exact requirements.

General Info
We only require the dimensions of your opening space and not your door sizes. When giving us the measurements enter the largest width dimensions and the smallest height dimensions.
- Measure the width and height of your space. Measure ceiling to floor heights in at least three places. Check your measurements twice to ensure accuracy.
- Use a spirit level to check your floors and ceilings are level. If not, provide us with the smaller measurement. We can provide bottom liners to allow up to 15mm using packers. Our maximum height for our sliding wardrobes ranges is 2450mm. If your wardrobe space is taller than this, we can look at other options including providing a matching header panel.
- We will work out all the measurements for the tracking system and frames. These are supplied with a cut over length to allow you to trim them to the exact size. If you already have a frame, please let us know so we can create the doors to fit your existing frame.
- Maximum widths for wardrobe sliding doors are 1200mm. Two doors will be a maximum width of 2400mm, three doors will be a maximum width of 3600 and a four door kit is 4800mm. If your space needs more than five doors, contact us for a quote.
- You may need to think about removing skirting boards and cornices before installing which will ensure a perfect fit. If you are installing on carpet it may be best to remove a section and replace with timber. This will ensure a stable bottom track.
When installing on carpet allow for 19mm bottom x 90mm plating (painted MDF) cut holes in carpet. Fixing packers every 400mm then attach 19mm x 90mm plate across width of opening measure from top of bottom plate to bottom of head.